

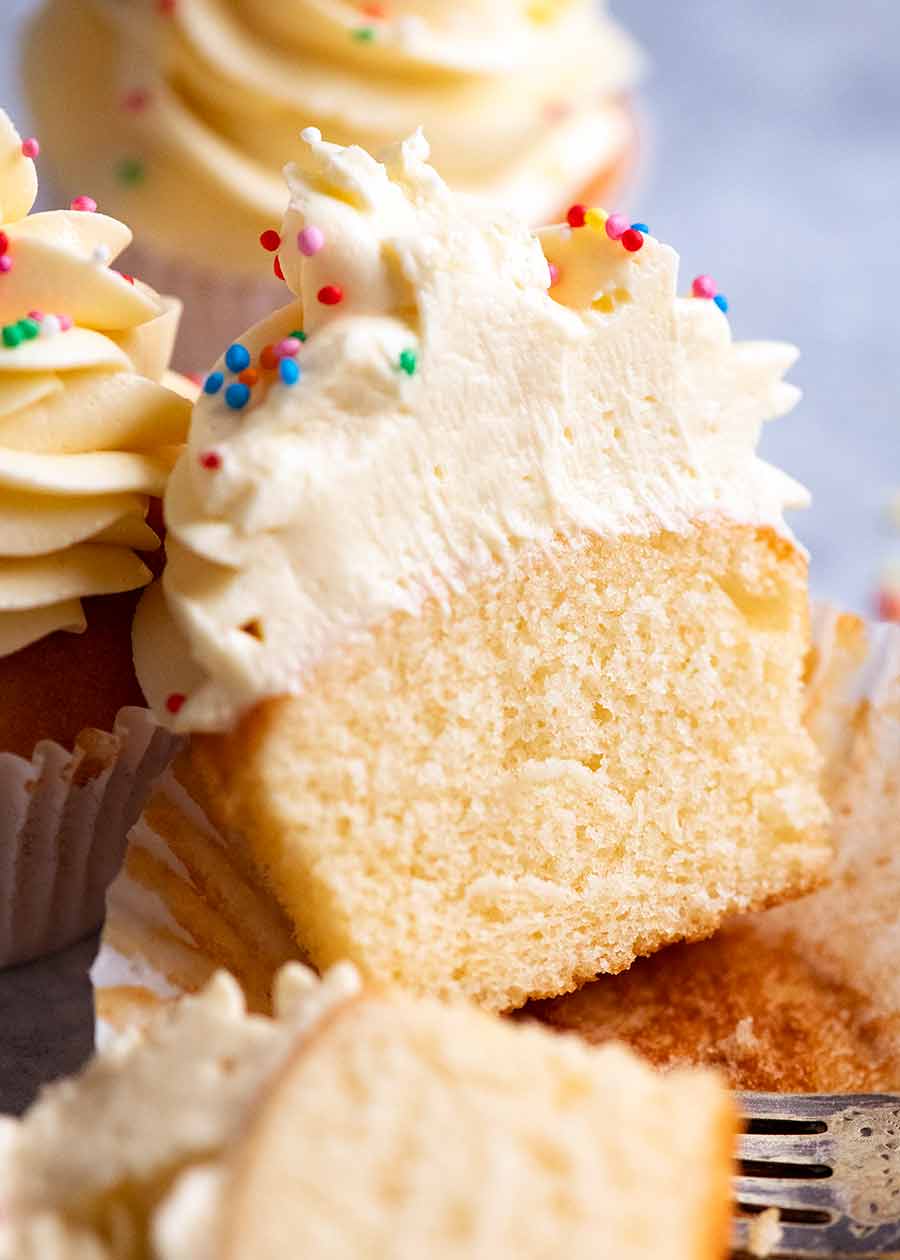
Using the batter from my much loved Vanilla Cake, these Vanilla Cupcakes have a professional bakery-style cupcakes and stay perfectly moist for 4 whole days which is unheard of for cupcakes!
No secret ingredients. Just a secret Japanese baking technique applied to classic butter cupcakes ingredients. It’s like…. magic! 
Vanilla Cupcakes
It’s notoriously hard to find a really good, classic cupcake recipe. Many promise game changing techniques, but all too often they fall short.
So why should you believe me when I say this is the last Vanilla Cupcake recipe you’ll ever use?
Because this is already a tried and proven recipe because it’s made using the batter from my Vanilla Cake. But don’t believe me. Browse the reader feedback!
“Holy mackerel, this cake is amazing.”
“…this is the sponge I’ve been looking for my whole life. It’s so perfect I almost wept with sheer joy.”
“Wow wow wow!”
(Also, the directions to make these cupcakes are hidden deep in the Vanilla Cake recipe notes, and an astonishing number of readers have already made these cupcakes!)
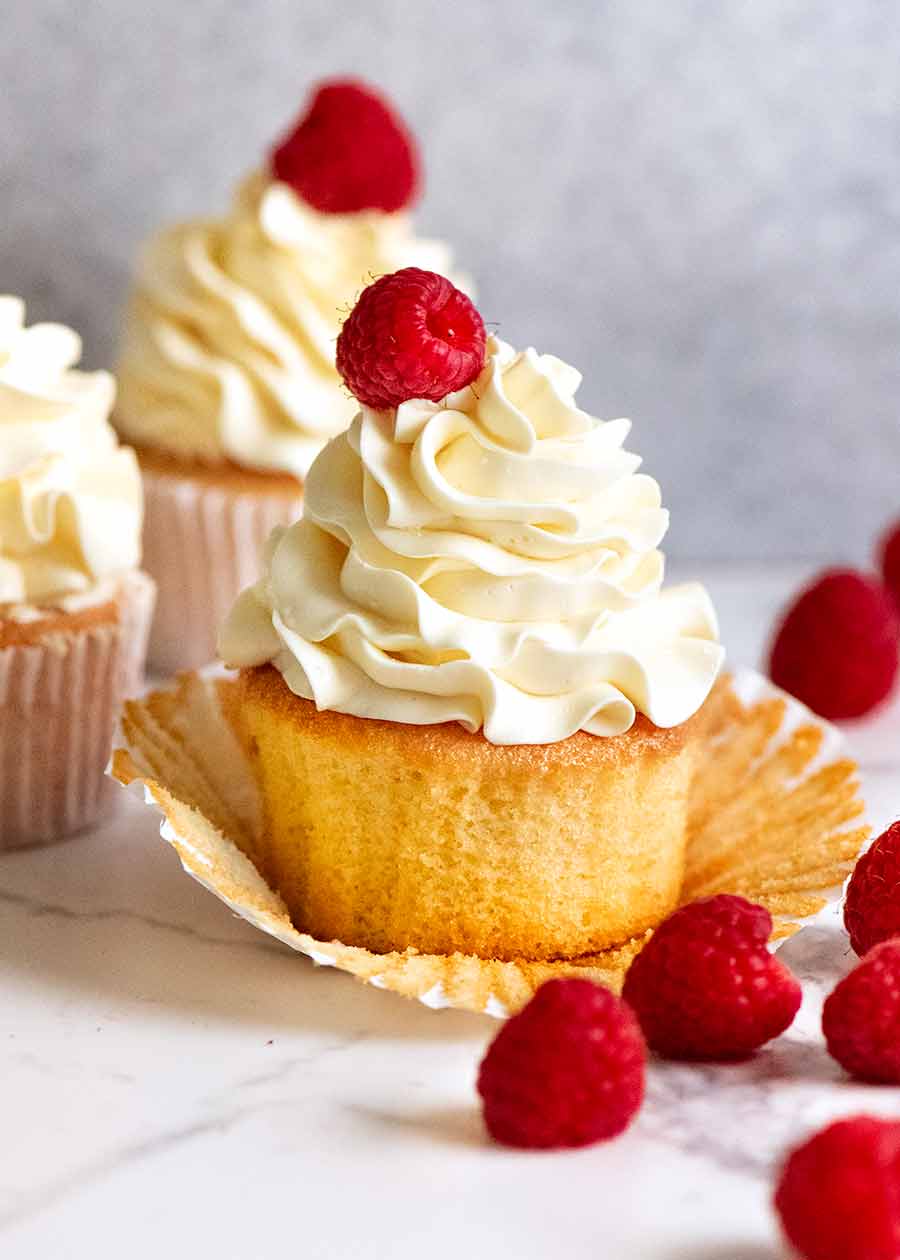
These Vanilla Cupcakes are …..
- Soft and fluffy, with a plush velvety crumb;
- Infused with elegant buttery and vanilla flavours;
- Perfectly shaped with a sweet golden dome;
- Much more tender than your usual run-of-the-mill cupcake recipes;
- Less sweet than typical cupcakes;
- Are safer to make than typical “cream butter and sugar” recipes; and
- Stay fresh and moist for 4 days (minimum).
Sydneysiders may be interested to know that these Vanilla Cupcakes are just like the cupcakes at My Little Cupcake in Neutral Bay, a hidden gem with a cult following which (10 years on) I still say trumps the famous Magnolia Bakery in New York. Ballsy! Call me on it – try these cupcakes! 
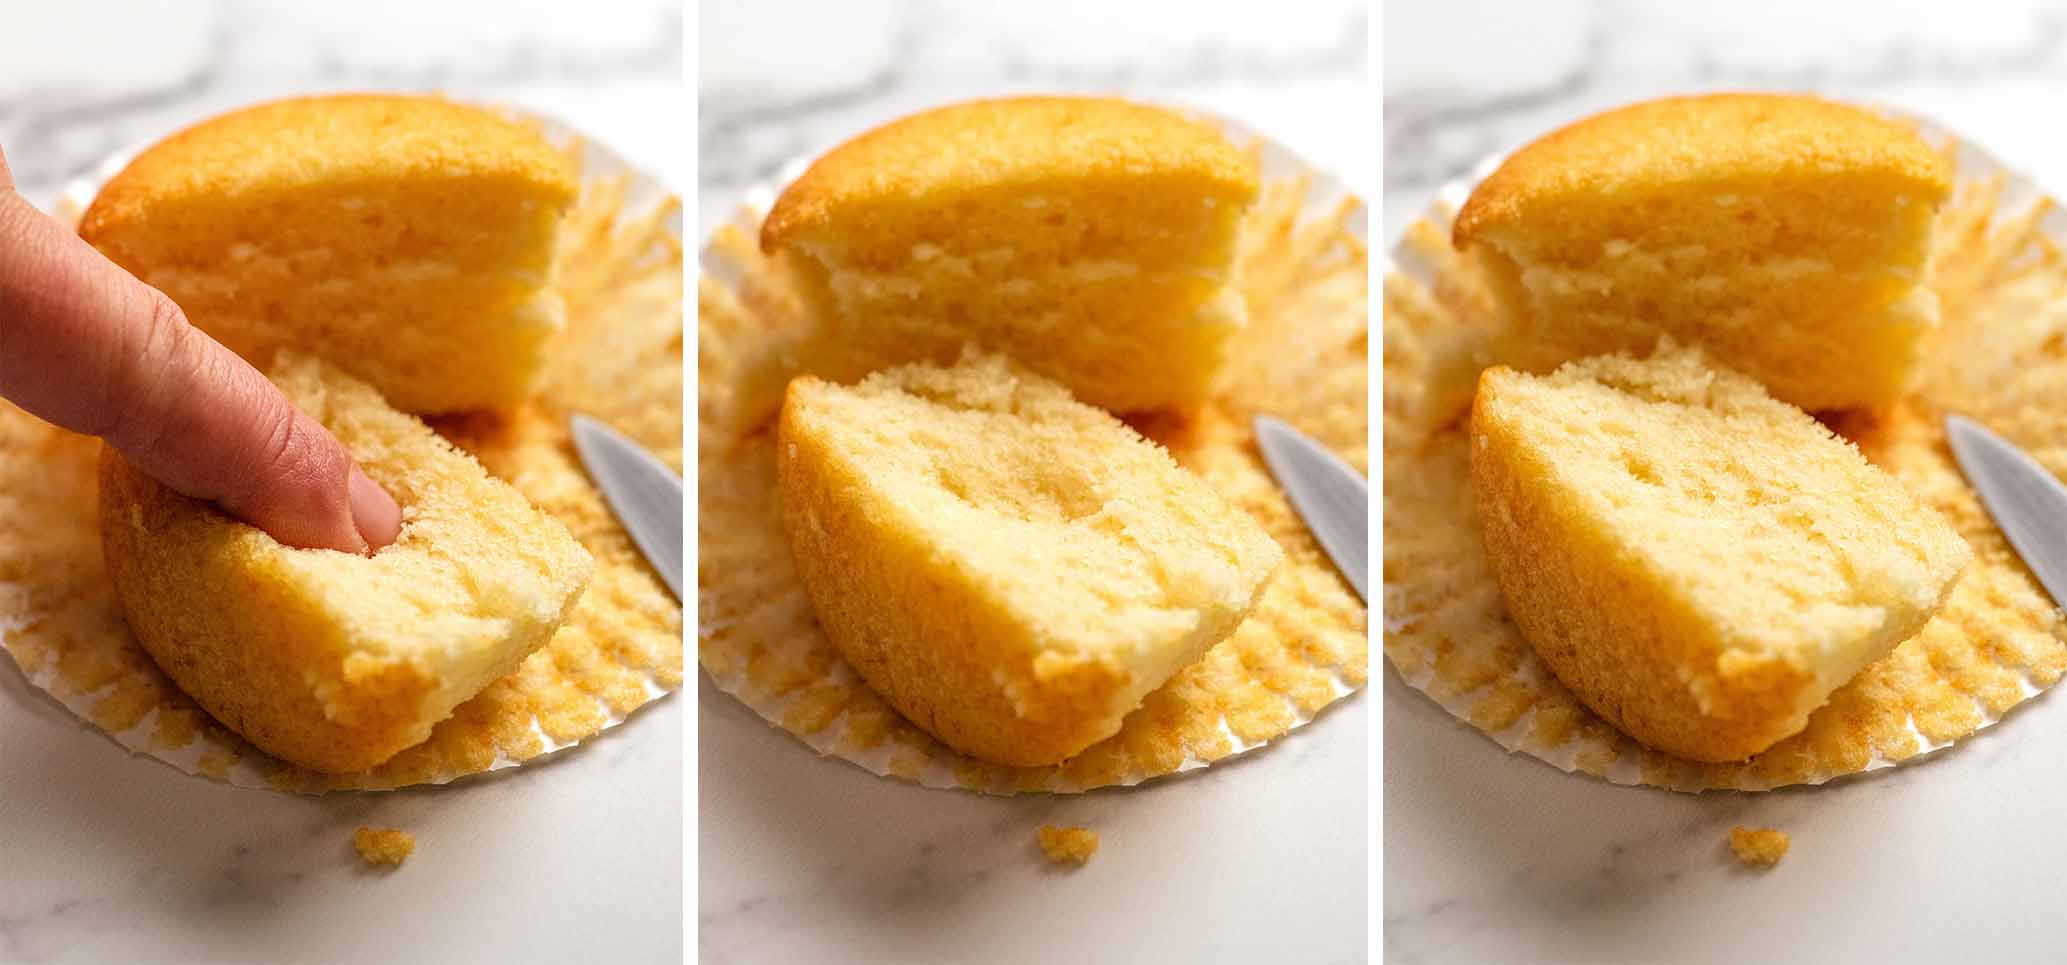
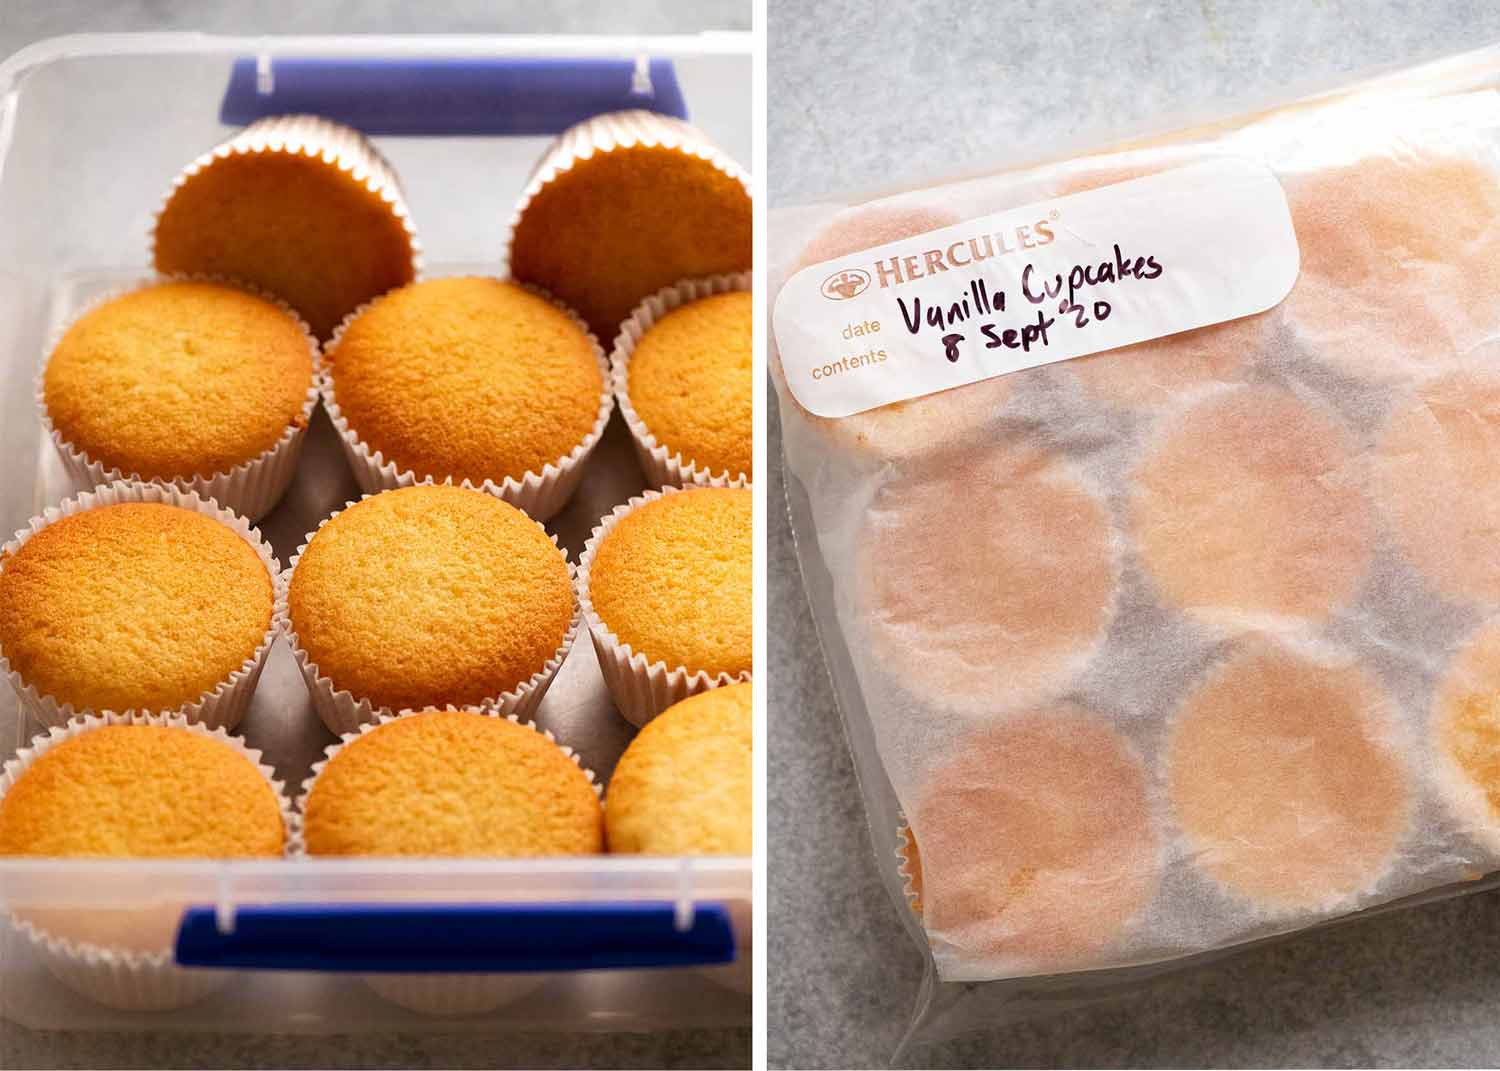
Freshness evidence!
Here’s my attempt to show you how these cupcakes stay incredibly fresh. The cupcake below is 4 days old. If it was dry and stale, the crumb would not bounce back like it does, it would just tear and stay indented.
And if it was dense, I would not be able to prod it at all!
This recipe uses classic cupcake ingredients but with Japanese techniques applied for the softest, plushest cupcakes you’ll ever make!
This post goes into detail on the steps to give bakers of all levels the confidence they need to make this. If you’re an experienced baker, you may wish to skip ahead to the recipe or recipe video. (Or Dozer )
What you need for these magical Vanilla Cupcakes
Here’s what you need for these Vanilla Cupcakes. Everyday pantry ingredients! Don’t waste your money on cake flour – these work better with plain/all purpose flour!
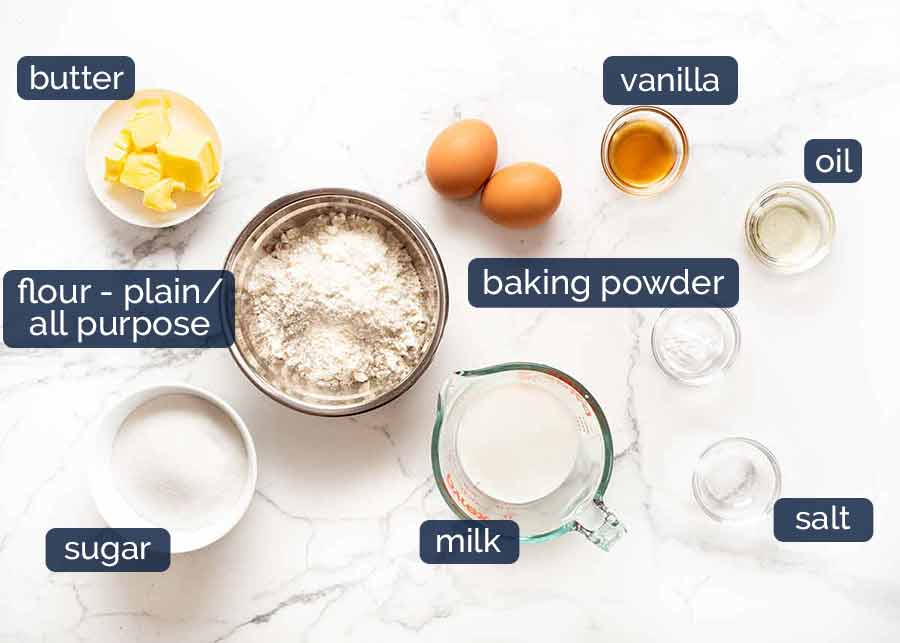
- Plain flour (aka all purpose flour) – there’s a widely held misconception that cake flour is the secret to tender, fluffy cupcakes. This is simply not true. These cupcakes actually come out better using plain flour rather than cake flour. You can taste the vanilla and butter slightly better, the crumb is slightly more velvety AND it keeps ever so slightly better too. Cake flour works very nearly as well so if that’s all you’ve got, it can be used. Do not substitute with self raising flour or gluten free flour;
- Eggs at room temperature, not fridge cold – whipped to aerate, these are key to make the cake extraordinarily light and fluffy. You don’t get an eggy flavour. It’s important for the eggs to be at room temperature as they whip better;
- Baking powder – not baking soda (bi-carb), it doesn’t rise as well. This is our safety net, extra helping hand to make the cake rise;
- Milk, full fat – just plain cow milk. Low fat works as well but rises marginally less. Do not substitute with non dairy milk or buttermilk;
- Sugar – best to use caster / superfine sugar if you can because it dissolves better in the eggs. But regular / granulated sugar works just fine too – you may just end up with slightly more (tiny!) speckling on the surface (from residual undissolved sugar grains. Barely visible to ordinary people – I’m just particular!
- Oil – just 1 1/2 teaspoons adds a noticeable hint of extra moistness, especially on Day 4, without weighing down the cupcake in the slightest; and
- Vanilla extract – the best you can afford. Imitation will work just fine, but the flavour isn’t as pure or real. I use Queen Vanilla Extract. Don’t waste your money on vanilla beans or vanilla bean paste – it’s not worth it for cupcakes.
How to make Vanilla Cupcakes
This cupcake recipe is straightforward and is in fact less risky to make than the typical recipe that starts with “cream butter and sugar….”. That single step is open to wide interpretation and is the single biggest cause of baking fails – especially cupcakes. The smaller the cake, the more prone to errors… but not with this recipe!
Beat eggs until fluffy
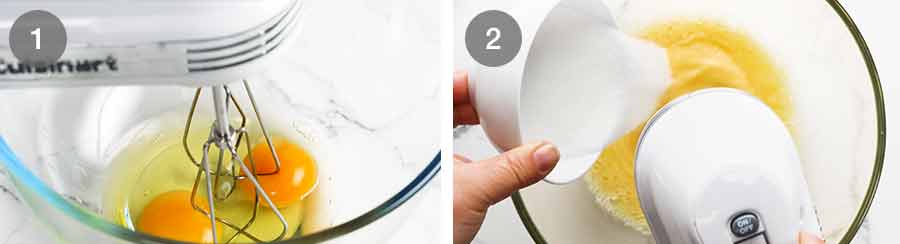
1. Use a handheld beater instead of a stand mixer – for small batch batters like this, it comes together better using a handheld beater you can move around the bowl rather than a large stand mixer bowl. If using a stand mixer, you’ll need to scrape down the sides and base well to ensure the batter comes together evenly. There is no excess batter in this recipe!
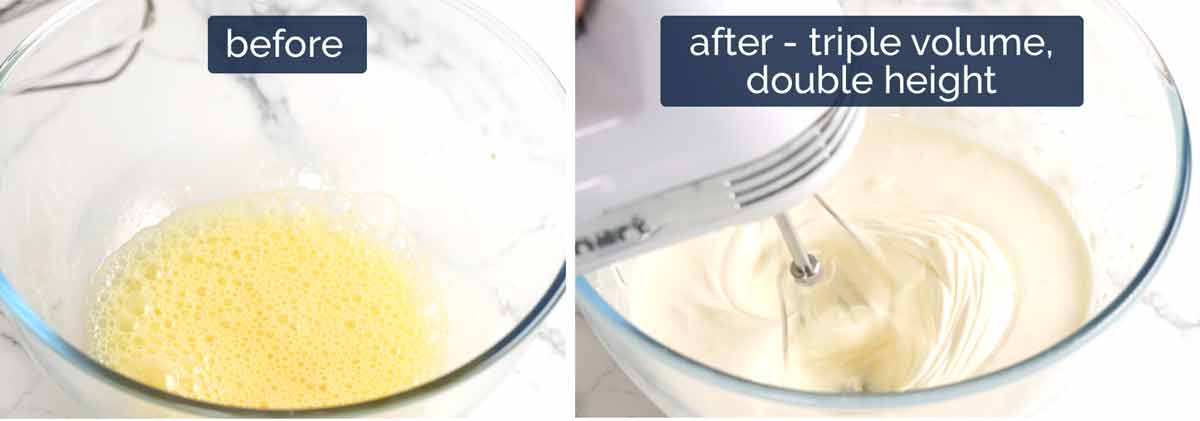
2. Whip the eggs and sugar – Beat the eggs with sugar for a whole 7 minutes until thick and glossy, it changes from yellow to white, and tripled in volume (just over double depth in the bowl).
The aeration created during this step is key for a soft, fluffy crumb. This is a technique borrowed from Japanese sponge cakes, world renowned for being the fluffiest in the world!
Here’s what it looks like before and after beating:
Top Tip: Don’t knock the air out
After the egg has been whipped, keep beating to a minimum otherwise you’ll knock the air out. Just follow my time and beater speeds and you can’t go wrong!
Gently fold in dry ingredients
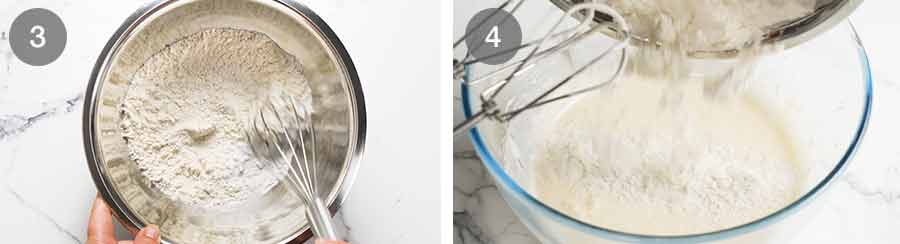
3. Whisk together the flour, baking powder and salt.
4. Gradually add the flour mixture into the egg mixture in 3 lots, mixing for just 5 seconds on Speed 1 in between. This should make the flour just incorporated – don’t worry if there are some streaks on the bowl not mixed in. Key here is minimum mixing!
Whisk together some batter with hot milk (tempering)
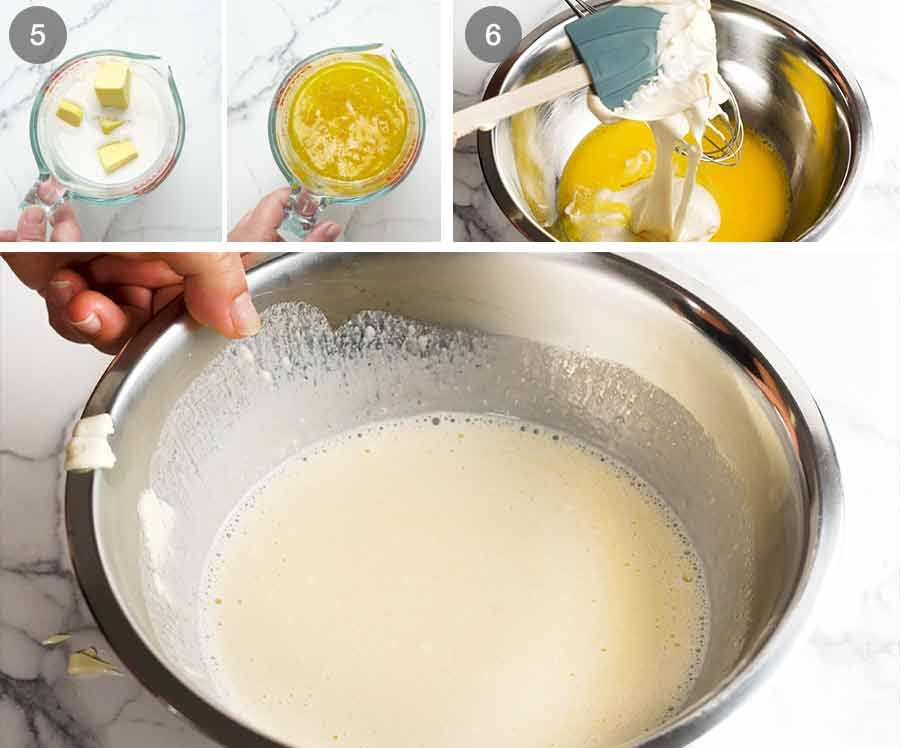
5. Melt butter and heat milk – use a microwave or stove to heat milk with the butter until it melts. HOT milk helps with rise for these cupcakes – I was dubious so I tried the Vanilla Cake with cooled melted butter in milk and found it did not rise as well.
6. Mix some batter into hot milk (tempering) – this serves two purposes: a) bring down the temperature of the hot milk so it won’t “cook” the eggs (ie. tempering); and b) it lightens up the density of the hot milk (see above – it becomes foamy) so it blends together faster when added to the rest of the whipped egg mixture. Remember, minimal beating is key so we don’t knock out the cake-rising-bubbles we created in Step 2.
Finish batter & fill cupcake liners
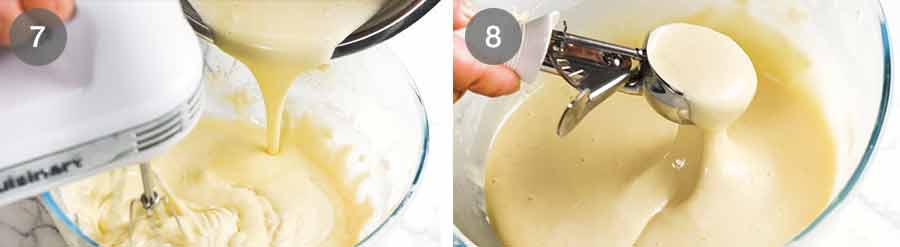
7. Slowly pour milk mixture back into whipped eggs over 15 seconds while beating on the lowest speed. Scrape down sides of bowl, then mix for 10 seconds – the batter should now be smooth;
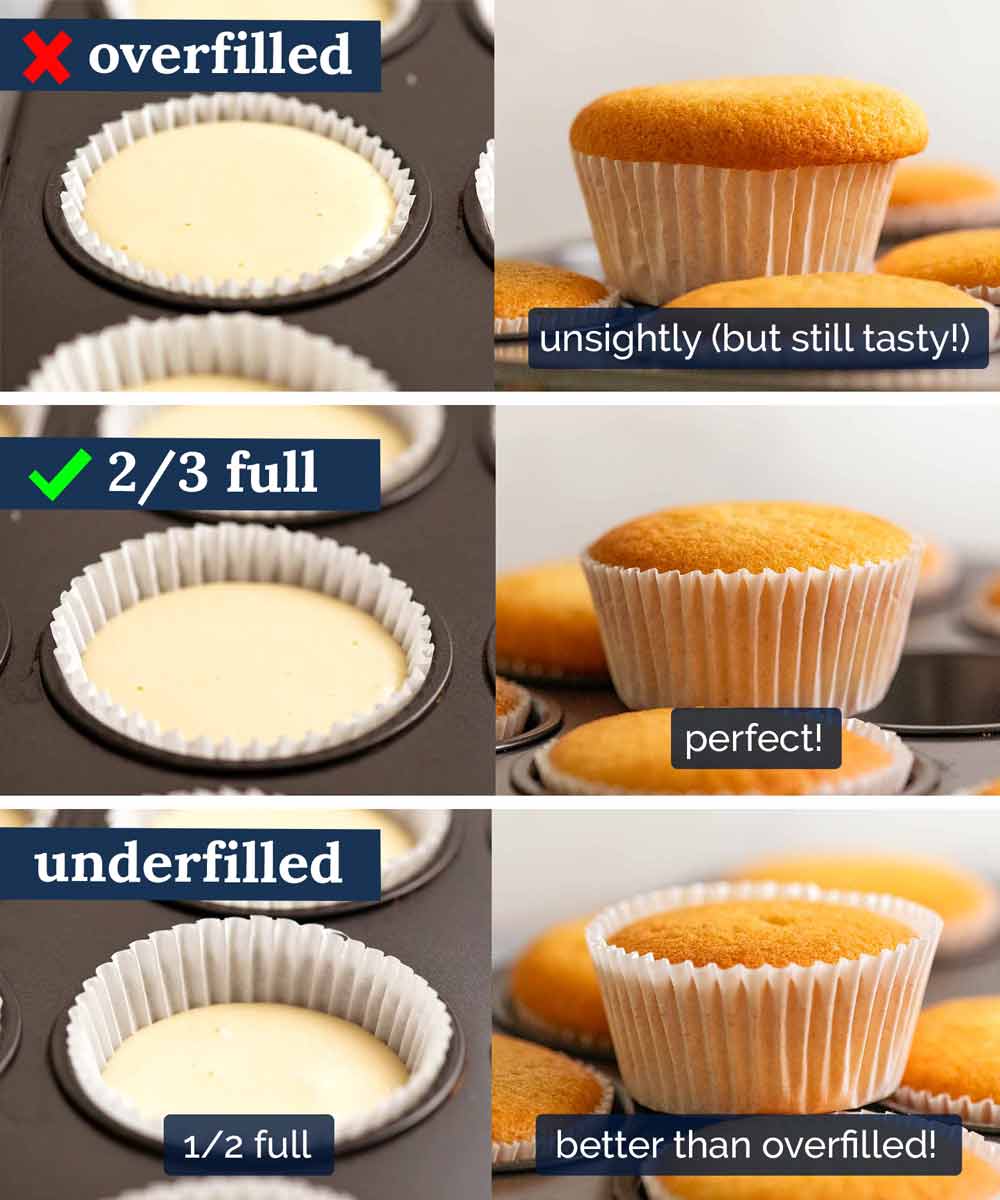
8. Fill cupcake liners with batter – I find the easiest way to do this is with an ice cream scoop with a lever. The standard size is 1/4 cup which is actually the perfect quantity for cupcakes!
KEY TIP: Do not overfill!
Only fill 2/3 to 3/4 of the way up the cupcake liner for a perfect shaped cupcake with a sweet golden dome. Too full = unsightly overflow and sometimes, it can even sink  . It is better to UNDER fill rather than overfill.
Why can overfilling make cupcakes sink? Because the sponge gets support from the liner – it climbs up the paper as it rises. Once it reaches the top, overflows or rises above the cupcake liner, it no longer has the support and this can cause the middle to sink.
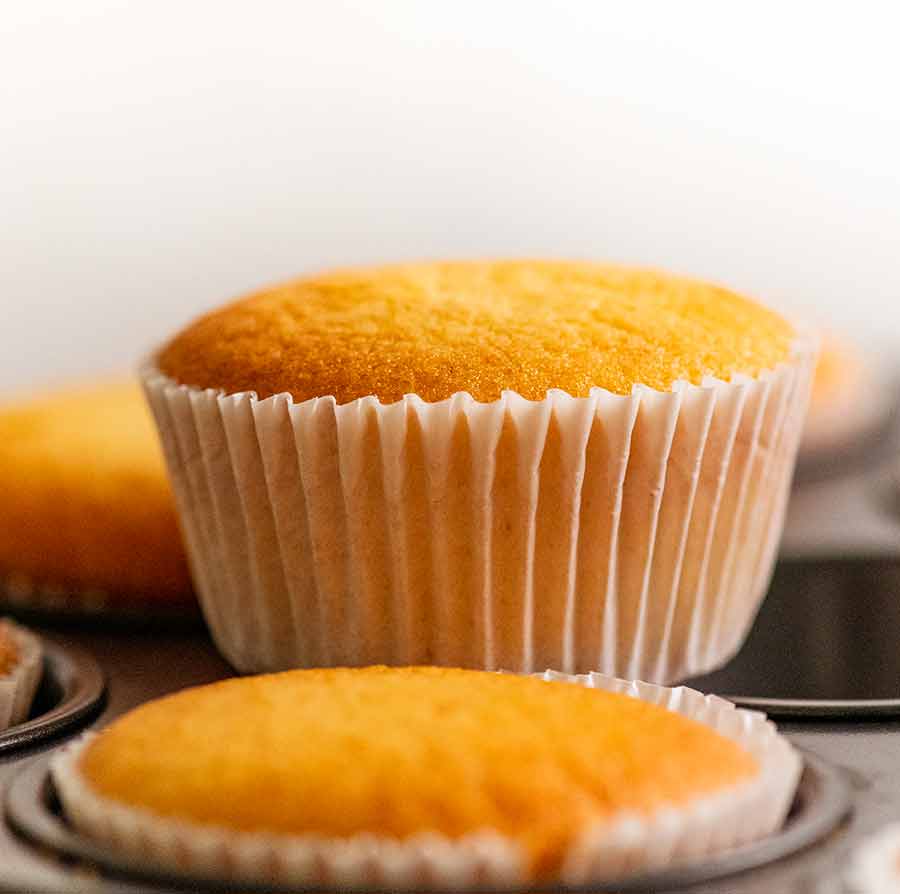
Bake 22 minutes
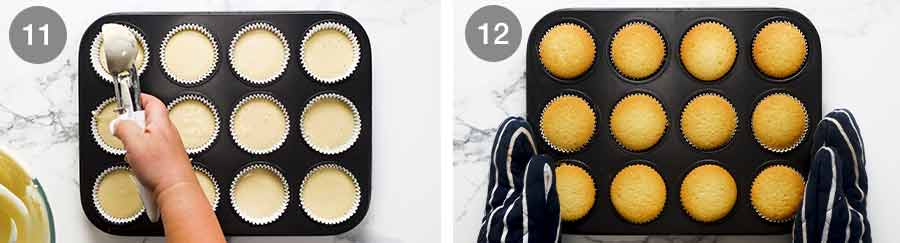
11. Bake 22 minutes until golden and a toothpick inserted into the centre comes out clean.
12. Remove after 2 minutes – Rest for just 2 minutes to let them cool slightly, then get them out of the muffin tin asap otherwise they will continue cooking and may overcook. Cupcakes are small – they overcook easily!

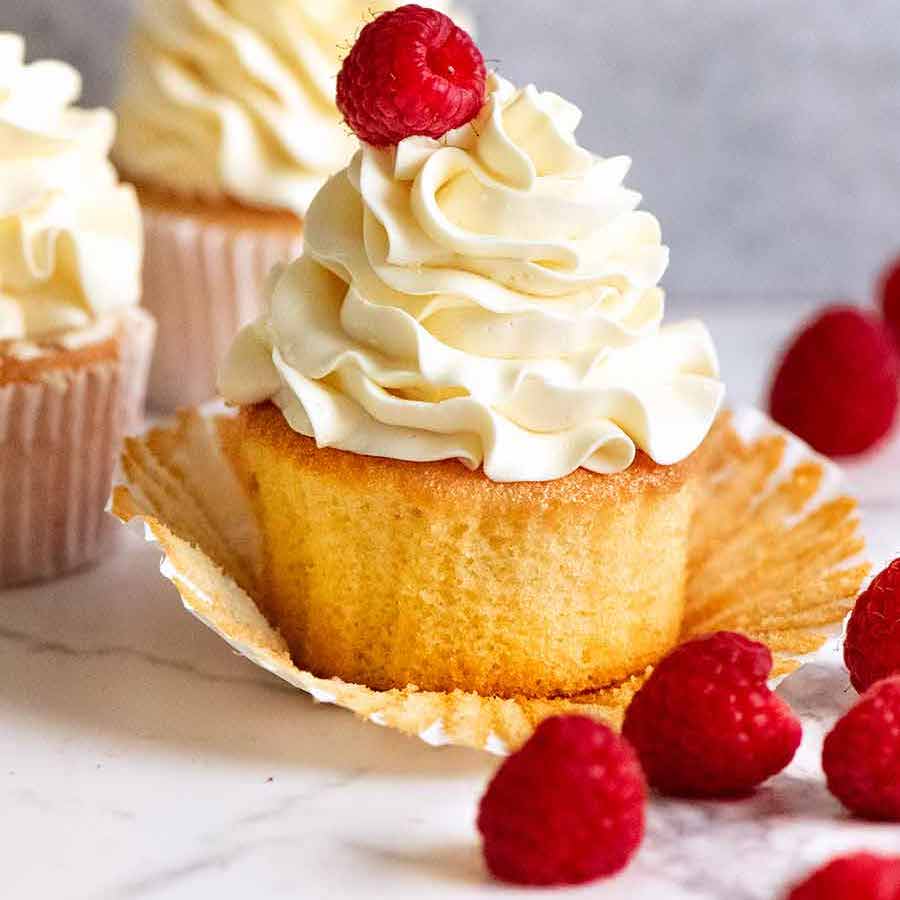
This is what your cupcakes will look like – beautifully golden with a sweet little dome. Not too rounded – flat enough for tall swirls of frosting to sit. But not too flat – so it looks pretty even just dusted with icing sugar (powdered sugar) or drizzled with a glaze.
Best frosting for cupcakes
The best frosting for cupcakes comes down to personal taste and, more often than not, storage, shelf life and transport logistics.
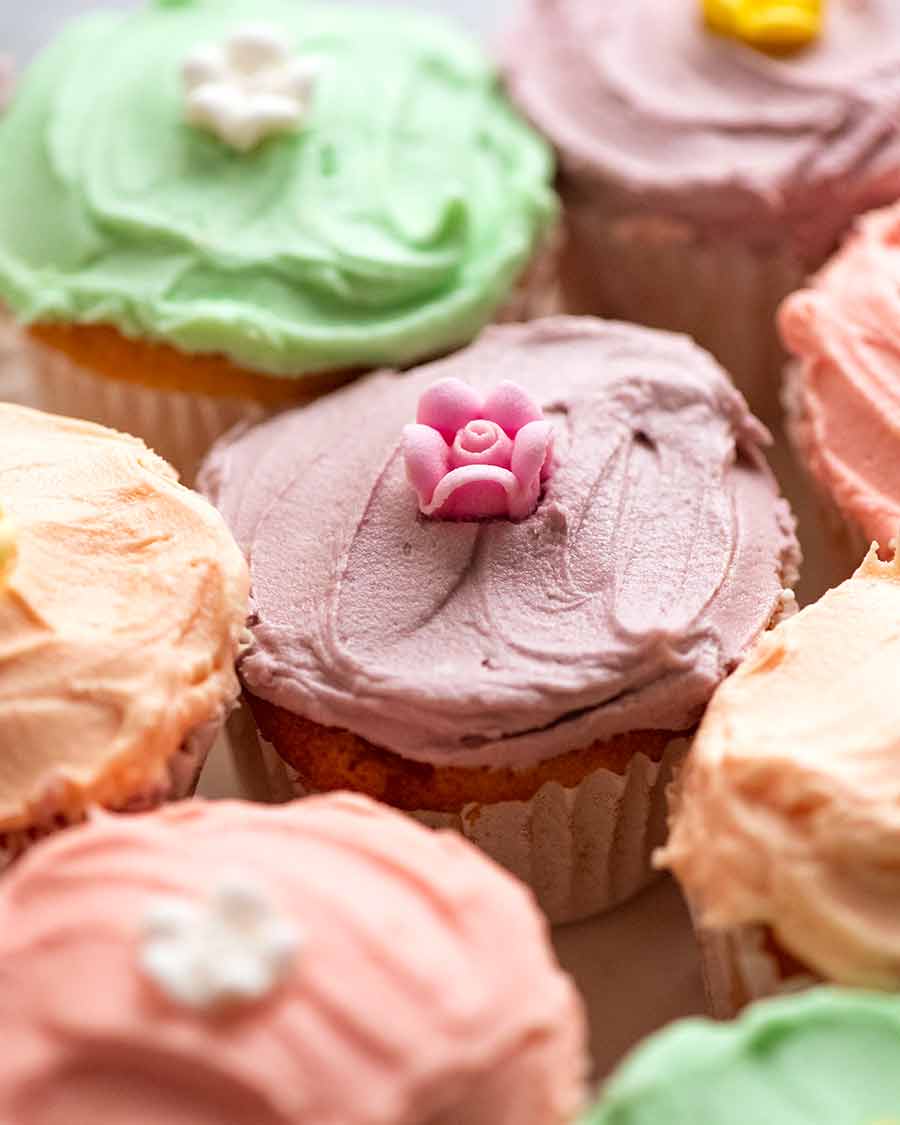
There’s a wide variety of frostings pictured throughout this post – I’ve noted the frosting used in the caption under each photo. My frosting library is currently sadly lacking (I’m working on it!) but here’s a few options for you:
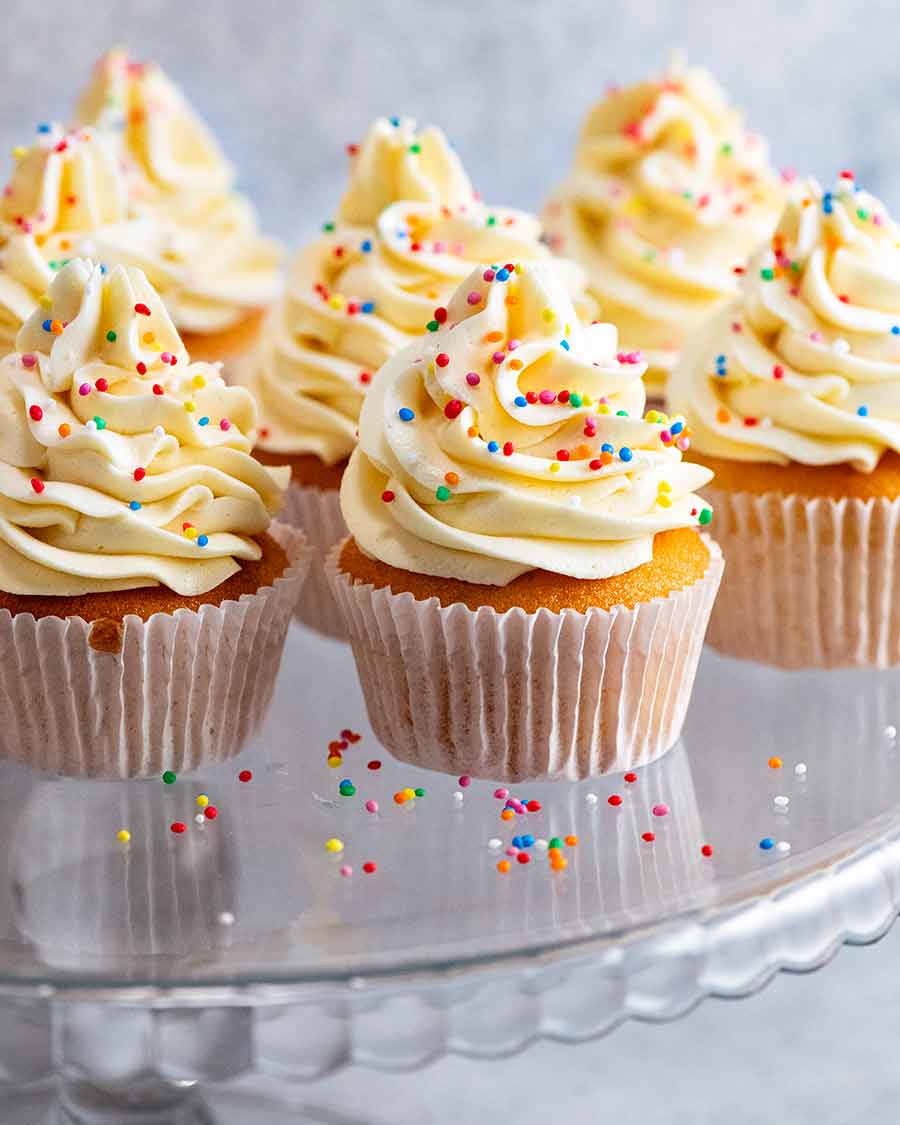
- Vanilla Buttercream – the classic and easiest of all whipped butter based frostings. Use the recipe in my Vanilla Cake (recipe will frost 12 cupcakes with tall swirls, or 24 frosted with a knife like the pastel coloured cupcakes at the top of this post);
- My Secret Fluffy Frosting (Less Sweet!) – technically it’s called Ermine Frosting, but many people haven’t heard of it by that its old fashioned name. This is one of my favourite frostings for cupcakes because it is 60% less sweet than buttercream, much fluffier and 100% smooth (buttercream will always have a bit of fine graininess from the icing sugar/powdered sugar). It has a texture like whipped cream but is slightly more dense. But unlike whipped cream which deflates in the fridge within hours, this Fluffy Frosting holds its form for days! Recipe coming in a few hours – writing it up right now!
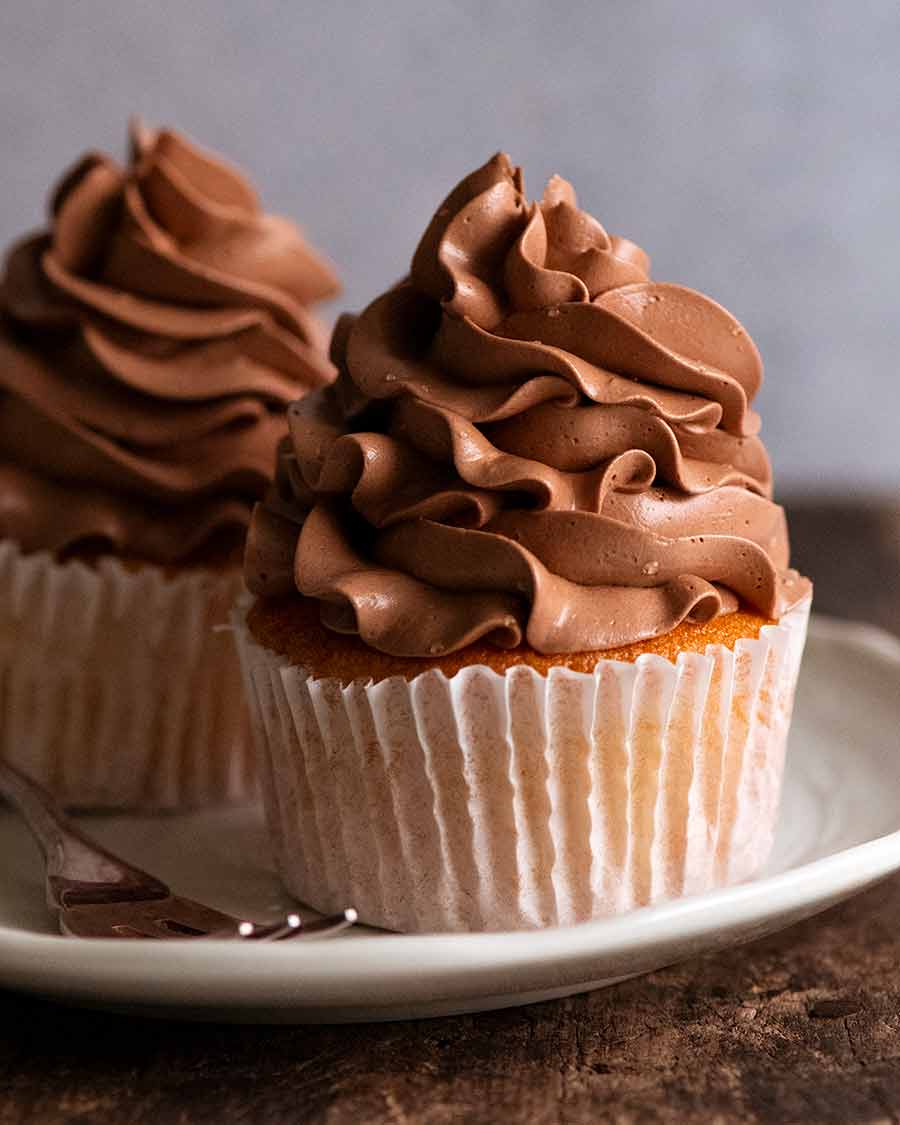
- Swiss Meringue Buttercream – many people consider this the superior version of traditional buttercream. Made using cooked egg whites whipped into a meringue, this is more technical to make than classic buttercream and yields a thick-yet-light silky smooth frosting that’s suitable for piping as high as you want, and holds its form for days. I haven’t shared a recipe yet but have used this recipe by a website called Sugar Spun Run. This frosting is pictured in all the cupcakes in this post frosted with Swiss Meringue (including the chocolate ones below).
Best way to store cupcakes
Being the little cakes that they are, cupcakes are prone to easily drying out if not stored correctly.
- Airtight container, stat! Don’t leave cupcakes out on the cooling rack longer than necessary. Once cool, get them in an airtight container as soon as possible;
- Mild weather: Naked cupcakes are best stored on the counter rather than in the fridge – at 25C/77F (highest temp), my cupcakes last for 4 days without loss of freshness. Use a cake dome with heavy glass lid (to ensure no air gets in) or an airtight container;
- Hot weather: Any hotter, store in the fridge in an airtight container BUT ensure you bring to room temperature before serving (naked cupcakes will take 30 minutes to come to room temp). The butter in the cupcakes firms up in the fridge, so cold cupcakes seem dry. Also, cold cakes just aren’t very pleasant!
- Freeze as follows: place sheet of baking/parchment paper on cupcakes, then wrap in cling wrap or place in single layer in ziplock bags. With paper in between, you can stack. Place in an airtight container (for extra security / avoid freezer smells) then freeze. To use, thaw in the fridge overnight (still in container) then bring to room temperature before serving;
- Iced / frosted cupcakes need to be stored the way the frosting needs to be stored. Most butter, cream cheese and cream based frostings need to be refrigerated. Follow the storage directions on the recipe you use. Then take cupcakes out of the fridge before serving;
-
No direct contact with cling wrap: Do not cover naked cupcakes with clingwrap – the surface will get tacky on Day 2 and the cling wrap will stick so when you take it off, it rips the surface off ; and
- Do not stack naked cupcakes on top of each other – for same reason as above.
TIPS to nail the cupcakes – Every. Single. Time!
1. Read the recipe from start to finish before you start. You can shortcut reading for my quick ‘n easy dinners, but for baking, read first then start!
2. Follow the recipe steps in the order listed – don’t get sassy and try to do things ahead or leave things until later. For example, if you melt the butter and heat the milk way in advance and it’s too cool by the time you use it, the cupcakes won’t rise as well;
3. Once you start, don’t stop until the cupcakes are in the oven – this is because the batter in this recipe relies on the aeration of whipped eggs. If you leave the batter lying around, the bubbles will deflate and your cupcakes won’t rise as much as they should (they will still rise from the baking powder, just not as much). So if your chatty Aunt Marge calls while you’re mixing the batter, let it go to voicemail!
4. Make sure your baking powder is still good – if you do everything right and the batter looks like it does in my video, but your cupcakes don’t rise, the culprit is probably your baking powder. Even if it’s not past the expiry date, if not stored in a cool dry place, or if “someone” left the lid off for days, it can lose rising power. To check if your baking powder is still good, place 1/2 teaspoon in a bowl and pour over boiling water. It should immediately bubble energetically. If not, it’s dead – chuck it!
5. Handheld beater instead of stand mixer – While for Vanilla Cake, I recommend using a stand mixer for ease, for these cupcakes, it’s the other way round. With this smaller batch batter, it’s easier to make using a handheld beater because the ability to move the beater around the bowl makes the batter come together easily with less bowl scraping.
However, you can use a stand mixer if you prefer. Just be sure to regularly stop and scrape down the sides AND base of the bowl using a rubber spatula. There’s no spare batter when only making 12 cupcakes!
6. Eggs at room temperature – these will fluff better and faster, leading to fluffier cupcakes. It’s easy to warm up fridge cold eggs – just leave in warm water for 5 minutes. What’s a room temperature egg? Pick up the egg. Fridge cold? Too cold. Cool but not cold? That’s ok. Very warm? Hopefully not – unless they just came out of a chicken!
7. De-chill icy cold mixing bowls – run them under warm tap water then dry before using. Not hot tap water – just warm. Why? Eggs aerate faster and better when slightly warm. Cold bowl will lower temperature of eggs. This is a general useful baking tip to apply on days when it’s 17°C – eg softened butter creamed in an icy cold bowl will make it firm up;
8. Eggs at room temperature, not fridge cold – because they whip better; and
9. Don’t substitute ingredients unless I specifically say you can in the recipe notes. Regular readers know that I’m very flexible with most of my savoury meals. But with baking, I get stern – because I want your cupcakes to work!
Vanilla Cupcakes – Recap!
PHEW! That is a LOT of information for these seemingly innocent looking little cupcakes! So just to recap the key points:
- This recipe yields cupcakes with a professional bakery-style crumb that are more tender, fluffy and moist than your usual recipes;
- This is done by applying Japanese baking techniques to typical Western cupcake ingredients;
- The cupcakes stay fresh and moist for 4 days which is an exceptional shelf life for cupcakes;
- Check to ensure your baking powder is still good (see recipe Note 2);
- Follow the recipe steps in the order listed, do not jump around;
- Once you start making the batter, do not stop until the cupcakes are in the oven; and
-
Most importantly, figure out how you’re going to deliver a freshly made cupcake to me. I’m done with cupcakes for a while. Someone make them for ME!

Especially for those who have been in pursuit of the perfect cupcakes all their lives, I hope you try, love and treasure this recipe as much as I do. For me, the biggest upside is that they’re still like freshly made on Day 4. Because every single other recipe I’ve tried were always disappointingly stale the next day. – Nagi x
Watch how to make it
Vanilla Cupcakes - stays moist 4 days!!
Ingredients
- 1 cup plain / all purpose flour (cake flour OK too, Note 1)
- 1 1/4 teaspoons baking powder (NOT baking soda, Note 2)
- 1/8 tsp salt
- 2 large eggs (50 - 55g / 2 oz each), at room temp (Note 3)
- 3/4 cup caster / superfine sugar (granulated/regular ok too, Note 4)
- 60g / 1/4 cup unsalted butter , cut into 1.5cm / 1/2” cubes
- 1/2 cup milk , full fat (Note 5)
- 2 tsp vanilla extract , the best you can afford (Note 6)
- 1 1/2 tsp vegetable or canola oil (Note 7)
Instructions
Preparation:
- Preheat oven to 180°C/350°F (160°C fan) for 20 minutes before starting the batter (Note 8). Place shelf in the middle of the oven.
- Place cupcake liners in a standard muffin tin. (Note 9)
Cupcake Batter:
- Whisk Dry: Whisk flour, baking powder and salt in a large bowl. Set aside.
- Heat Milk-Butter: Place butter and milk in a heatproof jug and microwave 2 minutes on high to melt butter. Do not let milk bubble and boil (foam ok). Cover and leave in microwave to keep very warm (stove: cover with lid and leave on turned off stove). (Note 10)
- Briefly mix eggs: In a separate, preferably heavy based glass bowl, beat eggs for 30 seconds on speed 6 of a handheld beater.
- Add sugar: With the beater still going, pour the sugar in over 30 seconds.
- Beat until tripled: Beat eggs for 6 minutes on speed 8, or until tripled in volume and almost pure white.
- Gently add flour: When the egg is whipped, scatter 1/3 flour across surface, then beat on Speed 1 for 5 seconds. Stop beating, add half remaining flour, then mix on Speed 1 for 5 sec. Add remaining flour, then mix on Speed 1 for 5 - 10 sec until the flour is just mixed in. Once you can’t see flour, stop straight away.
- Temper milk with some Egg Batter: Pour hot milk, vanilla and oil into the now empty flour bowl. Add about 3/4 cups of the Egg Batter into the hot milk (don't need to be 100% accurate with amount). Use a whisk to mix until smooth - you can be vigorous here. Will look foamy.
- Slowly add milk: With the beater on Speed 1, pour the Milk mixture into the Egg Batter over 15 seconds, then turn beater off.
- Scrape and final mix: Scrape down sides and base of bowl. Beat on Speed 1 for 10 seconds - batter should now be smooth and pourable.
Bake:
- Fill muffin tin: Pour batter into muffin tin, filling to 8mm / 1/3 from the top. Easiest to use a standard ice cream scoop with lever (filled to very brim).
- Bake 22 minutes or until golden and toothpick inserted into middle comes out clean.
Cool & frost:
- Remove from oven. Cool just 2 minutes then use a fork to help remove and place on cooling rack.
- Cool completely before icing with frosting of choice, or cream and fresh berries or jam.
Frostings
- See list of ideas in post and links to recipes! Pictured in post with my Secret Fluffy Less-Sweet Vanilla Frosting (coming in 1 hour!), Vanilla Buttercream (in my Vanilla Cake recipe, makes enough for 12 x tall swirls (pictured in post) or 24 knife-smeared (3rd photo in post), Chocolate and Vanilla Swiss Meringue Buttercream (coming in a couple of weeks!).
Notes
- read recipe from start to finish before starting;
- make sure your baking powder is not past its expiry (;
- work in order of steps per recipe; and
- once you start, keep going until it's in the oven. Do not at any point leave batter sitting around - bubbles will subside!
RECIPE NOTES 1. Cake flour works just fine with this recipe, but butter and vanilla flavour, and crumb is ever so slightly better using plain / all purpose flour. Also, cake flour makes the cake surface sweaty and sticky the next day. 2. Baking powder - dead baking powder is a common problem with cake fails. To ensure yours is good, even if not past expiry, place 1/2 tsp in a bowl and add 1/4 cup boiling water. If it bubbles, it's good. It not, it's dead - chuck it! Baking soda (bi-carb) won’t make the cake rise quite as well. If you have no choice, then use 3/4 teaspoons of baking soda. 3. Eggs - important to be at room temp as they fluff better when whipped which is key to the fluffy texture of these cupcakes. Quick way to warm up fridge cold eggs - place in a large bowl, cover with warm tap water (just warm, not hot), leave for 5 minutes. Wipe dry (to avoid residual water dripping into bowl), then use per recipe. Large eggs - 50 - 55g / 2 oz per egg this is the industry standard of egg sizes sold as "large eggs" in Australia and the US. If your eggs are significantly larger or smaller in size, just weigh your eggs and use 200 - 220g / 8 oz in total (including shell) or 180 - 200g / 7.3 oz in total excluding shell (crack eggs, whisk THEN pour into a bowl to measure out what you need). 4. Caster / superfine sugar are finer grains than regular / granulated sugar so it dissolves easier when whipped with the eggs. Granulated / regular sugar sometimes doesn’t fully dissolve which doesn’t affect the rise or texture but can leave some very fine brown sugar specks on the surface / sides. Not a big deal - just visual if serving undecorated. (But who serves cupcakes naked??) Do not reduce sugar - 3/4 cup is the minimum required for the eggs to whip into a stiff enough foam to make cupcakes rise sufficiently. 5. Milk - if you sub with lower fat milk then the texture of the crumb becomes a little less tender. Do not substitute with non-dairy milk, such as soy or almond milk. 6. Vanilla come in all sorts of qualities. I use Vanilla Extract. Better quality (more expensive) = better flavour, but I think vanilla bean paste is wasted in cakes. 7. Oil - just 1 1/2 teaspoons makes a noticeable difference to the moistness on the day it's made and most especially 4 days later. 8. Oven preheating - 30 minutes preheat is recommended to ensure no loss of heat when the oven door is opened. Never use the rapid heat function on your oven for baking, no matter how fancy your oven is! 9. Muffin tin and cupcake liners - use cupcake liners that sit about 4mm / 1/6" above the rim of standard muffin tin holes (1/3 cup holes). This is the perfect size to use 1/4 cup standard ice cream scoops to fill with batter, and makes perfect size cupcakes. Recipe will also work for larger and mini cupcakes but you'll need to adjust the bake time. 10. Milk must be hot / very warm when mixed with batter. So heat it up just before starting the batter. Don’t do this way ahead and let the milk cool (this affects rise). 11. Sweetness note - these cupcakes are sweeter than Asian cakes, less sweet than typical Western cupcakes (usually 1 cup sugar for 12 cupcakes). Please do not reduce sugar - 1 1/2 cups is minimum required to make the eggs foamy enough to rise. 12. Different measures in different countries - tablespoon and cup sizes differ slightly from country to country. In most recipes, the difference is not enough to affect the outcome of the recipe, but for baking recipes, you do need to be careful. These cupcakes have been specifically tested using both US and Australian cups (the two countries with the greatest size variance) and they came out exactly the same. So you can have confidence that this recipe can be used no matter which country you are in - only exception is Japan (cup sizes are considerably smaller (200ml) so please use weights provided). For absolutely certainty, opt to use the weights provided (click Metric toggle button above ingredients). Professional kitchens only use weights. 13. Storage - because cupcakes are small, they will dry out faster than cakes if left out. So be sure to put unfrosted cupcakes into an airtight container as soon as they are fully cool.
- Best way to store - airtight container in pantry, not fridge. Will stay near perfectly fresh for 4 days;
- If extremely hot where you are, they will need to be refrigerated. This does dry them out a touch, but they are still excellent. Take out 30 minutes before serving to bring to room temperate before serving;
- Frosted cupcakes must be stored according to the storage directions of the frosting - most will require refrigeration above a certain temperature or if kept for a prolonged period of time;
- Freezer - place parchment paper on surface, then wrap in cling wrap and put in an airtight container, or place in ziplock bag. Freeze up to 3 months. Thaw overnight in fridge, bring to room temperature before serving.
Nutrition
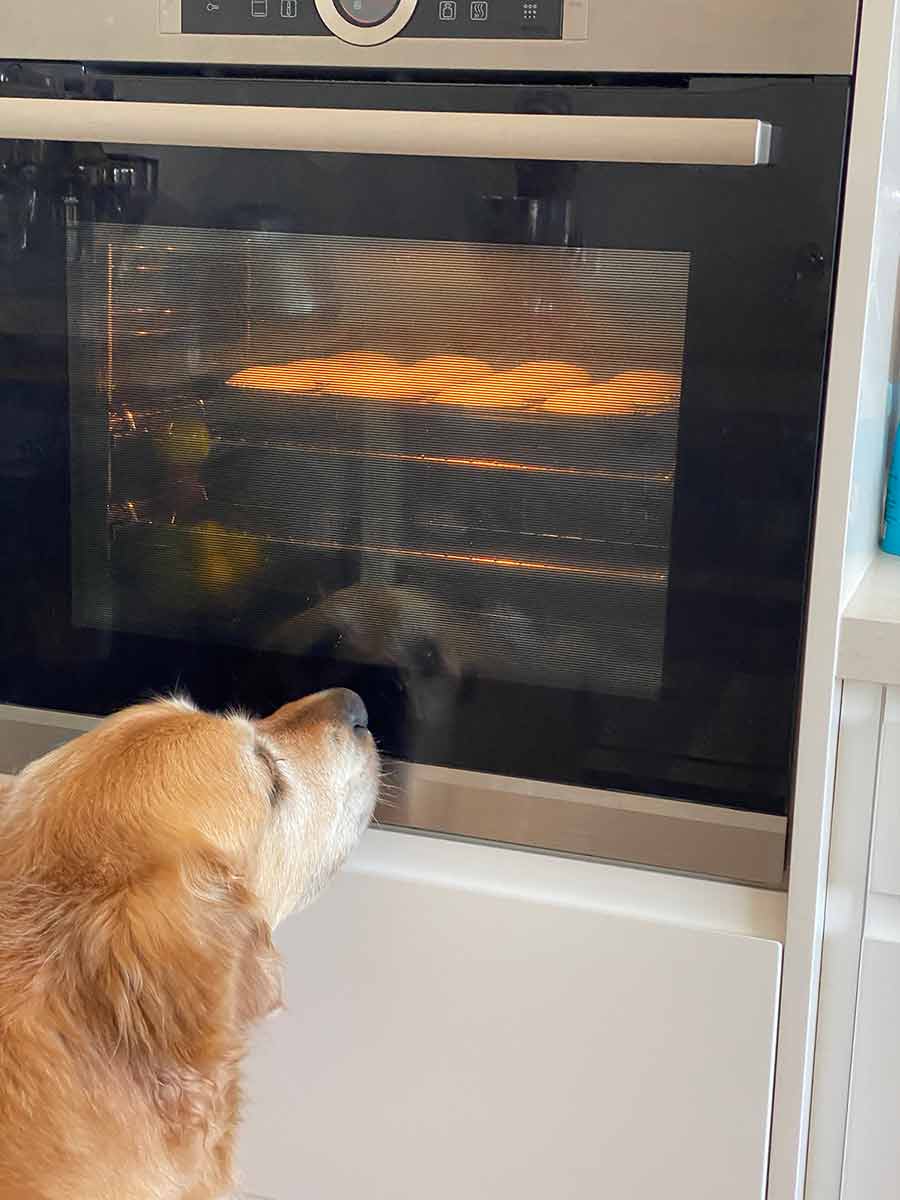
Life of Dozer
It is a good thing that oven door is heatproof, otherwise he’d scorch his little nose!
The post Magical Stay-Moist Vanilla Cupcakes appeared first on RecipeTin Eats.